Tuesday, March 15, 2016

In celebration of citrus...

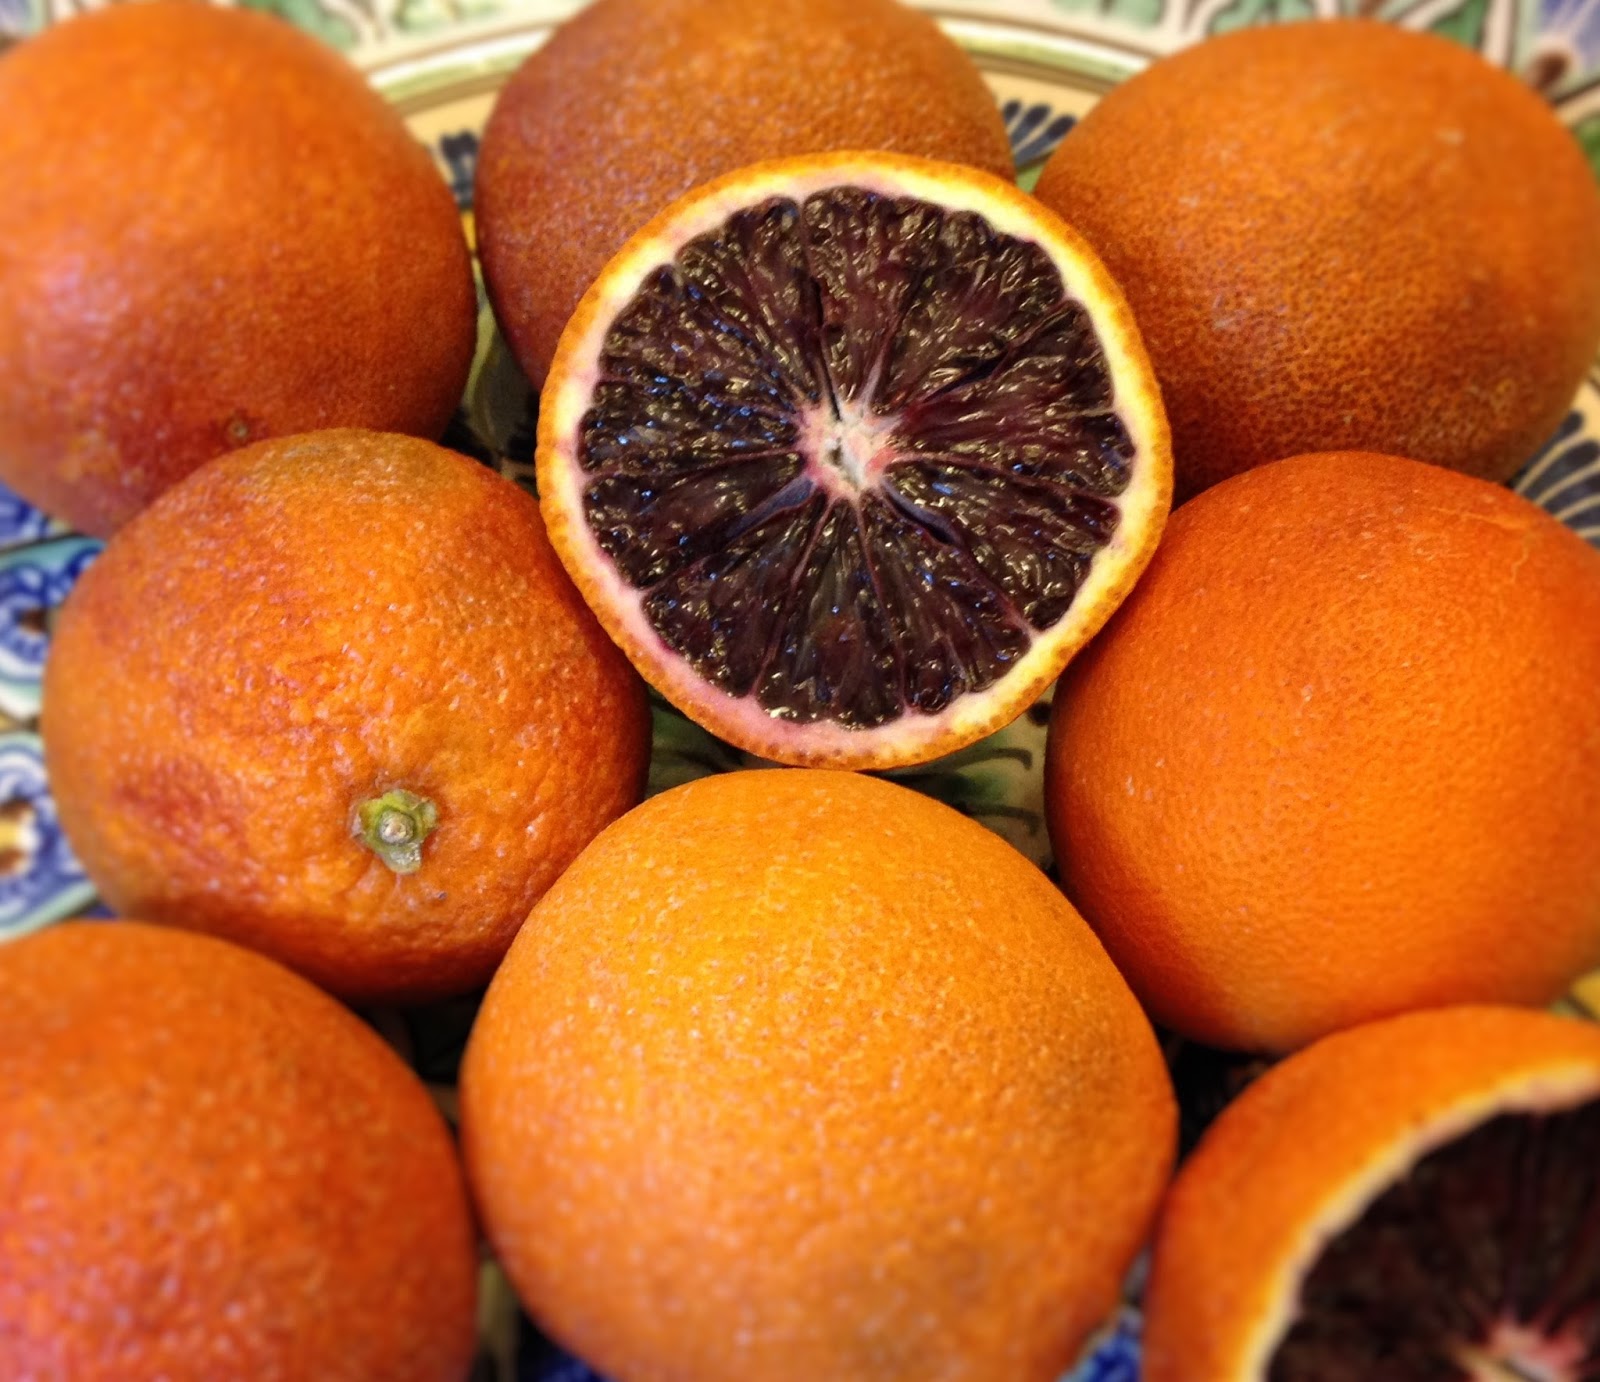
A lot of people don't realize this, but citrus is seasonal. We've become so accustomed to having oranges, lemons, limes, and grapefruit available year round, that I think some people think that it must grow and ripen year round. The truth is that the vast majority of citrus is a winter/spring fruit, with the season generally starting in November and running through April. That's when citrus is truly at its best, and certain varieties are only available at the market during this timeframe. One of my favorites is the blood orange.


Blood oranges are usually a little smaller than standard navel oranges. The outer skin may be completely orange in color, or it may be a mixture of red and orange. Depending on the variety of blood orange, the flesh might be deep orange flecked with red, or a deep, purply maroon. But what makes a blood orange truly special is the flavor. Orange mixed with raspberry, very sweet, very low acid. Be careful, though---the juice does stain!

So, in celebration of the blood orange, I decided to play with a classic--upside down cake. I hope you enjoy!


Blood Orange Cardamom Almond Cake

Makes 1 9-inch cake

You can make this cake with just flour, but I like to mix in almond meal for this recipe. It gives a nice texture to the cake as well as a delicate nuttiness that goes nicely with the blood orange and cardamom.

¼ cup blood orange juice
¼ cup light brown sugar
1 to 2 blood oranges sliced thinly
½ cup (1 stick) unsalted butter, softened
2/3 cup sugar
1 egg
zest of 1 blood orange
½ teaspoon vanilla bean paste
2/3 cup almond meal
2/3 cup all purpose flour
2 teaspoons baking powder
½ teaspoon cardamom
pinch of Kosher salt
2/3 cup whole milk

Preheat the oven to 350 degrees F.

Mix the blood orange juice and brown sugar together in a 9 inch round cake pan. Stir until the brown sugar begins to dissolve. Arrange the orange slices in an even layer over the bottom of the pan.


Place the butter and sugar into the bowl of a stand mixer fit with a paddle attachment. Mix the butter and sugar together on medium speed until well creamed--light and fluffy in texture and pale in color, about 3 minutes. Stop the mixer and scrape down the bottom and sides of the bowl. Add the egg, zest and vanilla, and mix until combined, stopping and scraping down as necessary.

In a separate bowl, whisk together the almond meal, flour, baking powder, cardamom and salt. Add half of the dry ingredients to the stand mixer bowl and mix through. Add the milk and continue to mix. Add the remaining dry ingredients and mix until just combined. Scrape down the bottom and sides of the bowl and finish mixing by hand.

Pour the batter into the cake pan, being careful not to dislodge the orange slices. You may need to use a spatula to gently spread and smooth the batter. Bake for 30 to 35 minutes or until a cake tester inserted comes out clean. Allow the cake to cool enough to handle, then run a paring knife round the edge of the cake pan to loosen. Place a serving plate on top of the cake pan and quickly invert the cake. Lift off the pan, slice and serve.

Tuesday, March 1, 2016

Another day at the Smithsonian....

What a crazy busy few weeks it's been! In the last 3 weeks, I've survived Valentine's Day, traveled to Boston for 3 days to train a new chef, and spent a day in Washington, DC, conducting a cooking demonstration at the Smithsonian Museum of American History. One of the casualties of this crazy schedule have been my days off (today is the first in 2 weeks), and the blog. Today is my day to catch up on both.

If you've been reading my blog this last year, you may remember that I was asked to do a cooking demonstration at the Smithsonian in July. The Museum of American History had built a kitchen demonstration stage and was doing a weekly series of presentations about food and it's influence and place in American history and culture. That series is continuing, although now only held once per month, and because of Sur La Table's partnership with the Smithsonian on this project, I was asked to conduct another demonstration. Because the segment was in February, shortly after President's Day, the topic was food and the presidency, with a specific emphasis on George Washington and Abraham Lincoln. (I know, what could food possibly have to do with either of them?)

After doing some research and talking with the Smithsonian representatives, we focused in on Lincoln. He was the first President to be born and raised on the American frontier, and the Smithsonian was very excited about the influence of his frontier upbringing on his presidency as well as the food. So I started to narrow my research.

It turns out that Lincoln wasn't much of a foodie. He prefered simple, plain food--roasted meats, boiled vegetables, corn bread, the stuff of a simple farm frontier life. He would often forget to eat, and his wife, Mary Todd, would ask the chefs at the White House to prepare simple dishes from his childhood to entice him to eat. In my research, I found many references to his fondness for chicken fricassee, so we settled on that for the first recipe for the presentation, to represent his frontier roots. 

Lincoln wasn't much for fancy foods, but he did have a sweet tooth, of which Mary Todd took full advantage during their courtship. Most of us associate the state of Illinois with Abraham Lincoln, but he was actually born in western Kentucky, then the American frontier. Mary Todd was also born in Kentucky, but to the landed, wealthy gentry, the bluegrass part of the state. It was the custom of the fine young ladies of the day to create a signature cake to serve to their beau when he came courting. Mary Todd's courting cake was a caramel cake, also called a burnt sugar cake, and Lincoln came-a-courtin' on a frequent basis.

I actually found a recipe for Mary Todd's courting cake, it was from a cookbook written by the granddaughter of Mary Todd's cousin. I was so excited, to have the actual recipe that Mary Todd followed, I couldn't wait to make the cake and taste it.

It was awful.

The cake was dry, tough, almost cardboard-like in texture. It was so unappetizing, that I threw it in the trash. It was only a few days before the Smithsonian presentation, it was too late to pick a different recipe, so I had to try and rework the cake. In the original recipe, only egg whites were used, so the first thing I did was to use whole eggs, hoping the additional fat from the yolks would improve the texture. The original recipe also said to whip the egg whites with a LOT of sugar, so much that the egg whites would only hold a soft meringue, minimizing the amount of air that could be held by the egg whites and therefore making the cake more dense. I changed the recipe technique from a sponge to a creaming method, and the result was a much more delicate and moist cake.

I suspect that the original recipe for the cake was meant to be somewhat dense and dry because classic technique would have the chef soak the cake in a flavored syrup. The texture of the cake is perfect for absorbing the sweet liquid. However, there was no reference to this in the original recipe, so I'm speculating. But I have to believe that Mary must have done something other than serve a slice of that dry tough cake to her future husband.

I hope you enjoy!


Chicken Fricassee Stew

The most basic recipe for a fricassee is to take a whole chicken, place it in a pot and cover it with water. Bring it to a boil and let it cook until the chicken is done. Stir in beaten egg, cream, or flour to thicken the gravy and serve. When developing the recipe, I decided that the chefs at the White House would probably have put a little more effort (and flavor!) into the dish. Mr. Lincoln didn't like anything too fancy, but I think he would have enjoyed my version.

Serves 8

¼ pound salt pork or smoked bacon, diced
2 whole chickens, cut into parts, or 5 lb bone in and skin on chicken thighs
all purpose flour for dredging
salt and pepper

2 yellow onions, peeled and cut into 2 inch pieces
6 carrots, peeled and cut into 2 inch pieces
2 russet potatoes, peeled and cut into 2 inch pieces
1 large sprig of thyme or 1 teaspoon dried thyme
2 bay leaves
water to cover

½ cup flour
¾ cup water

Add the salt pork or bacon to a large Dutch oven over medium heat. Cook, stirring, until the fat has rendered and the bacon has browned.

While the bacon is cooking, season the chicken with salt and pepper and coat in flour.

Add the chicken pieces, skin side down to the Dutch oven. Work in batches as needed to avoid over crowding the pan. When the chicken is lightly browned, turn and cook on the second side until lightly browned. Remove to a plate and repeat with the remaining chicken parts. Remove the last of the chicken to the plate and add the onions to the Dutch oven. Stir, cooking, until the onions begin to soften.  Return the chicken to the Dutch oven and top with the carrots and potatoes. Add the thyme and bay leaves. Add enough water to the Dutch oven to just cover the chicken and vegetables. Increase the heat to medium high and bring the stew to a boil. Reduce the heat to a simmer and cover with a lid. Simmer for about 20 to 30 minutes, or until the chicken is tender and cooked through.

Whisk the ½ cup flour and ¾ cup water in a small bowl. Slowly pour the flour mixture into the simmering stew, stirring the stew to incorporate. The gravy will thicken as the stew returns to a simmer. Season to taste with salt and pepper. Remove the bay leaves and thyme sprig.  Serve.


Mary Todd's Courting Cake

The glaze for the cake is not Mary Todd's recipe, it's one I adapted from a suggested frosting for her cake. Black walnuts would have been the traditional garnish, but I used pecans when I made the cake.  

Recipe adapted from Mary Gosford’s The Missouri Traveler Cookbook, published in 1958 by Farrar, Straus & Cudahy 

Makes one 8-inch layer cake

For the caramel sugar syrup:
½ cup granulated sugar
½ cup hot water

For the cake:
1 cup granulated sugar
1 cup unsalted butter, room temperature
3 eggs
1 teaspoon vanilla extract
1 ½ cups cake flour
2 teaspoons baking powder
¼ teaspoon fine sea salt

For the glaze: ½ cup unsalted butter
1 cup dark brown sugar
1 /3 cup whole milk
2 cups confectioners’ sugar
Chopped black walnuts, toasted (optional, for topping)

Preheat the oven to 350°F. Butter and flour two 8-inch round cake pans and line with parchment paper.

Prepare the caramel syrup: Add the sugar to a heavy saucepan and heat over medium heat. Stir continuously with a silicon spatula until the sugar melts and turns a very dark brown. Add the hot water and continue to stir until the sugar dissolves. Remove from the heat and allow to cool.

Make the cake: Place the butter and sugar to the bowl of a stand mixer fitted with a paddle attachment. With the mixer on medium high speed, cream the butter and sugar together until pale in color and fluffy in texture. Add the eggs and vanilla extract and mix to incorporate, stopping and scraping down the bowl and paddle with a silicone spatula as needed.

In a separate bowl, sift together the baking powder, flour and salt. Add a third of the flour mixture to the butter-sugar bowl and mix, followed by half of the cooled caramel syrup. Repeat with another third of the flour mixture, and the remaining half of the syrup. Mix in the final third of the flour mixture.

Divide the batter between the two prepared cake pans and bake for 45 minutes, or until a cake tester inserted into the center of the cake comes out clean. Allow the cakes to cool in the pan for 15 minutes, then remove the cakes from the pans and place on wire racks to cool completely.

While the cakes bake and cool, make the glaze: Melt the butter in a heavy saucepan. Add the dark brown sugar and cook over low heat for 2 or 3 minutes, stirring constantly. Carefully add the milk and bring to a boil. Cool to lukewarm, then transfer to the bowl of a stand mixer fitted with a paddle attachment. With the mixer on low speed, gradually add in the powdered sugar. Increase the mixer speed and beat vigorously until the mixture is smooth.

Once the cakes are cooled, place one of the two layer cakes onto a wire rack set over a rimmed baking sheet. Pour a small pool of glaze onto the top of one of the two layer cakes and spread with an offset spatula to cover the top of the layer. Place the second cake on top and pour the remaining glaze over the top, allowing it to flow over and down the exterior of the cake. If the glaze has cooled too much, you may need to use an offset spatula to spread the glaze. Garnish with toasted black walnuts, if using, and serve.


Tuesday, February 2, 2016

Soup weather...

This crazy winter....Ten days ago, we got about 2 feet of snow. Today, it's sunny and almost 50 degrees. The good news is that this warm spell is helping to melt all of that snow. But, there's still enough of a chill in the air that I'm craving warm, comfort food. And, I still have a freezer full of chicken stock.

I gave myself the challenge of putting together a soup without making a trip to the grocery store. I opened my pantry and found a container of wild rice on a back shelf. I had chicken breasts in the freezer, and the box of baby spinach in the fridge was starting to look a little wilted and no longer salad-worthy. A couple of lemons, and I was set.

I hope you enjoy!


Chicken, Wild Rice and Spinach Soup with Lemon

The lemon in the soup adds a bright note and an unexpected twist on the traditional chicken soup.

Serves 6 to 8

3 tablespoons extra virgin olive oil
2 small onions, finely chopped
3 cloves garlic, finely chopped
2 cups wild rice
2 sprigs of thyme
8 cups chicken stock
2 boneless skinless chicken breasts, thinly sliced
5 ounces baby spinach
juice of 2 lemons 
Kosher salt and black pepper to taste

Heat a large Dutch oven or soup pot over medium heat. Add the oil and onions, and cook, stirring, until the onions are softened and translucent, about 3 to 5 minutes. Add the garlic and cook, stirring, until fragrant, about 1 minute. Stir in the rice, thyme and chicken stock. Increase the heat to medium high and bring the mixture to a boil. Reduce the heat to a simmer and cover the pot with a lid. Cook for 45 minutes, or until the rice is tender.

Increase the heat to medium and return the soup to a high simmer. Add the chicken and cook until the chicken is no longer pink and cooked through, about 10 minutes. Stir in the spinach and lemon juice and cook until the spinach is wilted, about 2 minutes more. Season to taste with salt and pepper.  Serve.

Tuesday, January 26, 2016

Soup's on...

We had an amazing snow storm this weekend, a true blizzard. We got over 2 feet of snow here at my apartment, and the mall actually closed on Saturday. (You have to understand, the King of Prussia mall NEVER closes.) 

So, what do you do when you're stuck indoors during a blizzard? Well if you're like most of us, you post pictures on Facebook of the snow piling up outside your house, digging your car out of the snow, your dogs playing in the snow, and the food you've been cooking all day. I myself am guilty of the first two Facebook postings, I enjoyed all my friends' pictures of their dogs (my cat Lulu just watched the snow from the window), but I saved my food pictures for this blog posting.  *smile*

One of the benefits of my recent experiment with chicken stock is that I now have a freezer full of it. And Saturday was the perfect day for soup. Back before culinary school, when I was just starting to teach myself to cook things beyond my mom's cookies, I used to try and replicate recipes that I saw on television cooking shows or that I had tasted in restaurants. Living in the suburbs of Houston, many/most of the restaurants were large chains. This soup was inspired by a soup I ate regularly in one of those chain restaurants. (I'll leave it to you to guess which one.) I've since come to know that the dish is actually a fairly traditional soup from Italy, so I feel a bit better....


Sausage, Potato, and Kale Soup

The version of the recipe I'm presenting below is the original, but you can really have fun by using different types of sausage, potatoes, and greens. One of my favorite variations is to use Spanish chorizo and sweet potatoes.

Serves 6 to 8

3 tablespoons extra virgin olive oil
1 to 1 ¼ pounds Italian sausage (I used sweet, but spicy is good, too)
2 medium onions, diced
4 cloves garlic, peeled and chopped
8 cups chicken stock***, low or no sodium
1 bunch kale or 5 ounces baby kale
2 pounds red potatoes, sliced thinly on a mandolin
2 cups cream or half and half
Kosher salt and black pepper to taste

In a large soup pot or cast iron Dutch oven, heat the olive oil over medium heat. Remove the sausage from the casings and add to the pot, stirring and breaking up the sausage as it browns. When there is no longer any visible pink in the sausage, add the onions and cook, stirring until they have softened and started to turn translucent, about 5 minutes. Add the garlic and continue to cook, stirring, until the garlic is fragrant, about 1 minute more. Season with salt and pepper, add the chicken stock and bring the soup to a high simmer. 

While waiting for the soup to come to a simmer, prepare the kale by tearing the leaves away from the center vein/rib. Discard the vein/rib, and tear the kale leaves into bit sized pieces. If you are using the baby kale instead, there is no need to remove the center veins/ribs or to break down the leaves any more, they can go straight into the soup.

When the soup comes to a high simmer, add the kale and potatoes. Return to a simmer, cover the pot, and let the soup cook until the potatoes and kale are tender, about 15 minutes. Stir in the cream or half and half and season to taste with more salt and pepper. Serve.


***One last note--the stock that I used in this recipe was half chicken wing stock and half chicken feet stock. If you read my blog posting on stocks, you know that the stock made from wings had the best flavor, but the stock made from the feet had the most gelatin. The texture of the finished soup was incredible. The soup had a velvety, buttery mouthfeel, you could really tell the difference the chicken feet were making. There was so much gelatin in the soup that when I took the leftovers out of the refrigerator, it had firmed up to the consistency of soft jello. (I think this is so cool...forgive the moment of food geekery!)

Monday, January 18, 2016

Going bananas....

I have a love/hate relationship with bananas. I like fresh bananas, but only when they're just barely ripe, no brown spots, with a bit of green still in the peel. I don't particularly care for banana desserts--banana pudding, banana ice cream, bananas Foster.  Mehhh, they just don't do it for me. Banana "flavored" items, like candies or syrups, are just plain gross. But, I love banana bread.

Once a banana starts to get soft and develop brown spots, I throw them in the freezer. After I've accumulated 3 or 4, I pull out the stand mixer and turn on the oven. My recipe is pretty simple by comparison to a lot of them out there. There are no fancy flavorings, I don't add bourbon,or chopped chocolate, or any of the other variants you come across much of the time. But, this recipe lends itself well to those kinds of additions, so feel free to add your own mix-ins. My personal preference is chopped pecans.

Enjoy!


Banana Bread

Makes 2 standard bread loaves

While this bread is excellent on its own, try toasting the slices and topping them with a little butter. Delicious!

¾ cup unsalted butter
1 cup granulated sugar
1/3 cup light brown sugar
4 eggs
2 cups mashed banana (about 4 bananas)
3 ½ cups all purpose flour
4 teaspoons baking powder
1 teaspoon baking soda
½ teaspoon Kosher salt
1 cup chopped pecans

Preheat the oven to 350F. Butter and flour two standard 8 or 9 inch bread loaf pans.

Place the butter and sugars in the bowl of a stand mixer fitted with a paddle attachment. With the mixer on medium speed, cream the butter and sugars together until they have reached a light and fluffy texture and a pale color. Scrape down the bottom and sides of the bowl. Add the eggs and mix through.

Add the mashed banana. I like to leave a few chunks in the puree. Depending on how firm the bananas are when you mash them up, you will sometimes even see them in the finished loaf. 

Once the banana is thoroughly mixed into the egg and sugar mixture, scrape the bottom and sides of the bowl.

In a separate bowl, mix together the flour, baking powder, baking soda and salt. Add the dry ingredients to the mixer bowl and mix to blend. Stir in the chopped pecans.

Divide the batter between the two prepared loaf pans and bake for 50 to 60 minutes, or until a cake tester inserted into the center comes out clean.  Allow the loaves to cool in their pan for about 30 minutes, then remove from the pans and place on a wire rack to cool completely.

The loaves will freeze well, just wrap them well in plastic wrap, the foil, and place them into a ziptop bag in the freezer.

Tuesday, January 12, 2016

Taking stock....

We go through a lot of stock at work, especially this time of year. With so many soups, stews, braises, pan sauces, etc., on the menus, we can go through gallons a week. Most of the stock we use is chicken stock, and we pride ourselves on using only house-made. We save chicken carcasses and bones, and the onions, celery and carrots from our knife skills classes in bags in the freezer. When our supply starts to get low, out come the large stock pots and we start a new batch.

There's nothing like the aroma of a pot of simmering chicken stock. You should see the customers in the store...people will come in from the mall, their heads tilted slightly back, their noses in the air, inhaling deeply. They eventually find their way back to the teaching kitchen where they immediately ask what we're cooking that smells so good. When I tell them that we're making chicken stock, quite often they ask if it's for sale. I think we've had more than a few students sign up for their first cooking class because they happened to be in the store on stock-making day.

One of the advantages of making your own stock is that you have complete control over the salt content. Most of the dishes that you'll cook using stock will require reducing the liquid in the dish. Reducing means allowing the pot of sauce/sauce/stew/soup to simmer without a lid, allowing the water to evaporate away. This concentrates the flavors, including the salt. Most store-bought stocks are very heavily salted. Just read the nutritional information printed on the side panel, many of them have 30% or more of the daily recommended sodium for just a single serving. Even the ones that are "low sodium" or "no salt added" can be 15 - 20%. By making it yourself, you can leave salt out completely.

So, what exactly is stock and how does it differ from broth? The simplest way to describe the difference is that stock is made from bones and broth is made from meat. Broth uses whole parts, like legs and thighs, even the whole chicken. It is usually only cooked for 1 to 1 ½ hours, and the meat is then picked from the bones and used. A lot of old-school chicken noodle soups are made this way, with the meat going right back into the broth to make the soup. Stock is usually simmered for 3 to 4 hours then strained, and only the liquid is retained. The longer simmering time allows the natural gelatin in the bones and joints to dissolve into the stock, and when stock is cooled to room temperature, it will have the texture of soft Jello. 

When we make stock at work, we usually supplement the bones and carcasses in the freezer with chicken wings. Wings make a really nice stock. But, when I'm shopping at the local asian and latin american markets, I often see packages of other types of chicken parts--backs, necks, and feet. Yes, chicken feet. I've heard for years that feet make the best stock. They're all tendons, bones and connective tissue, very little meat, so a very gelatinous stock. A gelatinous stock is especially good for making sauces, it helps to thicken the sauce without need to reduce it as much.


I've had this idea for a while to make stock with different parts to see if I can see a discernable difference in the final product. When I was at the local latin market last week, I picked up packages of wings, necks, and feet, and I've had three pots of stock simmering away on my stove all afternoon.

My recipe for stock is more of a formula:

1 part mirepoix*, by weight
3 to 4 parts chicken parts/bones, by weight
1 to 2 quarts of water per pound of chicken parts/bones
a few stems of parsley and thyme, a bay leaf or two, and a sprinkling of black peppercorns

*Mirepoix is a classic mix of aromatic vegetables used in French cuisine---2 parts onion, 1 part carrot and 1 part celery. 

Start by placing the chicken parts in a large stock pot and add the water. I had 2 ½ to 3 pounds of each of the different chicken parts, so I added about 4 to 6 quarts of water to each of the pots.


Bring the pot up to a full boil. You'll start to see foam forming on the top of the water. The foam is the result of the blood and other impurities in the chicken parts. Using a spoon or ladle, skim off this foam and discard.


Reduce the heat to a simmer and let the stock simmer for about 2 hours. At this point, add in the mirepoix, herbs and peppercorns. No need to peel the carrots or the onions, it can all just go right into the pot. The onions skins will even give a little golden color to the finished stock.


Continue to simmer the stock for another 2 hours or so. By now, the chicken parts will start to fall apart, and the vegetables will be very soft. Remove the stock from the heat and pass it through a fine mesh sieve set over a large bowl. Discard the chicken parts, vegetables,and other bits.

It's important at this point to cool off the stock relatively quickly in order to minimize bacterial contamination. Try to get the stock down to room temperature in about an hour, then place it in the refrigerator. Don't put the stock into the refrigerator while it is still hot--the refrigerator really won't cool it down that fast and you instead risk heating up the interior of the fridge too much. At work, we place the stock in a large container set into our prep sink filled with ice water to chill. At home, I split the stock into small, quart sized storage containers. The stock will cool more quickly once broken up into smaller portions.  

After filtering the three stocks, I tried to see if I could determine any immediate difference between them. The wing stock was slightly darker in color, the feet stock was the lightest, and the neck stock was somewhere in between.


I tasted each of the stocks. Without salt, none of them taste like chicken soup, but the all had a slightly different flavor and mouthfeel. The wings stock had the best chicken flavor and the thinnest texture. The feet stock definitely had a thicker mouthfeel, but the flavor was a little less pronounced. As you might expect, the neck stock was somewhere in between. 


All three of the stocks had a certain amount of fat. The best way to remove the fat is to chill the stock. The fat will rise to the top and solidify at which point it can be scraped off with a spoon. 


After chilling the three stocks, I tasted them again. Once cooled, you can really tell the difference in the gelatin. The stock made with feet is thick, really noticeably so when you stir it with a spoon. The neck and wing stock also thickened up, the neck stock a bit more than the wing. Pretty much the results you would expect.

Now I have a freezer full of chicken stock...time to make soup! But that's for another blog posting....

Tuesday, January 5, 2016

Taco Tuesday....

The holidays are over and winter is finally making an appearance in the Philly area. Christmas day it was so warm that I actually turned on the air conditioner, but last night when I drove home, the temperature display on my car dashboard read 13°F.

I remember growing up in Houston, I never understood why folks wanted to take tropical vacations in the winter. Of course, running the AC on Christmas day is pretty normal in Houston. I could understand taking a trip to the mountains to ski, but warm and tropical just didn't compute.  

Then I moved to the northeast. Now I understand.

While the winter this year hasn't been very cold, at least up until now, tropical vacations are still in the works for a lot of my friends and neighbors. Winter is also our busiest time of the year at work--cooking classes make great holiday gifts, and our classes are selling out fast. It's actually a vacation blackout time for the chefs, through the end of February. So, a tropical vacation is just not in the cards right now.

Although I can't go to the tropics, I can at least take the tropics for culinary inspiration. One of my favorite Mexican dishes is Cochinita Pibil. "Cochinita" is the Spanish word for a baby or suckling pig, and a "pibil" is a traditional cooking fire pit in the Yucatan. The cochinita is marinated in a mixture of garlic, bitter orange juice, ground achiote seeds, and other spices. The pibil is dug into the ground and a fire is built and allowed to burn down to the coals. The pibil is then lined with banana leaves, the cochinita is placed on top of and wrapped with the leaves, and the pibil is then covered over to hold in the heat. The cochinita slowly roasts, getting flavor not only from the marinade, but the banana leaves and smoky coals. After the cochinita has been removed from the pibil, the meat is shredded and served with pickled onions and corn tortillas.

Digging a pit in the backyard isn't an option for most of us, and neither is cooking a whole suckling pig. A cast iron Dutch oven and pork shoulder will definitely fit the bill instead, but banana leaves are a must to get the flavor of the pork right. Banana leaves can be found in Asian or Latin markets, either fresh or frozen. You might find the ground achiote seeds (also called annatto) and bitter orange juice (also called Seville orange juice) in larger grocery stores, but I recommend going to a Latin market for these ingredients as well. 

I hope you enjoy!


Cochinita Pibil (Yucatan Braised Pork)
Serves 8 to 10

For the marinade:
1 tablespoon Kosher salt
1 tablespoon ground annatto seeds
½ teaspoon ground cumin
¼ teaspoon dried oregano
¼ teaspoon ground allspice
1/8 teaspoon cayenne pepper
5 cloves garlic, passed through a garlic press
¼ cup bitter (Seville) orange juice, or fresh sour orange juice

For the pork
4 to 5 lb     pork shoulder roast (bone-in or boneless)
1 cup bitter (Seville) orange juice, or fresh sour orange juice
1 or 2 banana leaves (thawed if frozen)

Pickled onions, pico de gallo salsa, sour cream, and corn tortillas to serve
                 
To make the marinade, mix the salt, spices, garlic, and ¼ cup orange juice together in a large bowl. Cut the pork roast into 3 or 4 large chunks of approximately equal size. (If you buy your pork at a Latin market, you can often find the bone-in shoulder already cut into 1 to 2 inch thick slices, which is what I usually use for this recipe.) Sprinkle each piece liberally with salt and ground black pepper. Place the pork pieces into the bowl with the spice paste and coat completely with the paste.

Using either a gas stove burner, a propane grill, or a creme brulee torch, pass the banana leaves over an open flame.  


This will soften the leaves as well as to burn off the green odor and flavor in the leaves. This is a very important step, if the leaves aren't torched, they will give too much of their flavor to the pork.


Place the leaves in a single layer at the bottom of a large oven safe stew pot or Dutch oven. Place the pork pieces and all of the marinade on the leaves, then wrap the leaves over and around the pork. Place a lid on the pot and marinate in the refrigerator for 20 to 24 hours.


Preheat the oven to 300°F.  Partially unwrap the top layer of banana leaves and pour in 1 cup bitter orange juice. Rewrap the leaves, and bake the pork, covered, for 3 to 4 hours.

Carefully unwrap the leaves and remove them from the pot, leaving the pork and cooking liquid in the pot.  


Using two forks, shred the pork, removing and discarding any bones and large pieces of fat or skin. Mix the shredded pork into the cooking liquid. 


Serve with pickled onions, pico de gallo salsa, sour cream, and corn tortillas.

Pico de Gallo
Makes 7 cups

1 large sweet onion, such as Maui or Vidalia (about 14 to 16 oz), diced
9 Roma tomatoes (about 2 lbs), diced
2 jalapeƱo peppers, seeded and diced
1 cup firmly packed cilantro, leaves and tender stems, chopped
1 teaspoon Kosher salt
2 tablespoon freshly squeezed lime juice

Mix all ingredients together in a large bowl. Serve with corn tortilla chips.


Pickled Red Onions

½ cup sugar
½ cup red wine vinegar
1 cinnamon stick
2 star anise
1 red onion, sliced VERY thinly

Bring sugar, spices, and vinegar to a boil in a small sauce pan. Place the onions in a heat proof bowl and pour the hot vinegar mixture over the onions. Cover the bowl with plastic wrap and let cool to room temperature. Remove the cinnamon stick and star anise and chill the onion vinegar mixture in the refrigerator.