Wednesday, September 20, 2017

Visions of sugar plums...

Today is the first day of fall, and here in North Texas the high temperature today was flirting with 100 degrees. (I knew what I was getting into when I moved back to Texas, but I must admit, I am ready for some cool weather.)  Even though the weather here is still screaming "SUMMER", in reality, the summer growing season is pretty much over and we are starting to shift towards autumn. A sure sign of the changing seasons is the giant display of pumpkins at the front of the store, and apples have taken over the produce department. But, there was one last gasp of summer to be found in recent weeks--sugar plums.


Most of us know about sugar plums from the famous poem, "'Twas the Night Before Christmas" or from the Sugar Plum Fairy in Tchaikovsky's "The Nutcracker". Those sugar plums, however, refer to a candy called a comfit which is a nut coated with multiple layers of sugar, something akin to a Jordan almond. The sugar layers were incredibly difficult to apply, and comfit were usually lumpy and unevenly shaped. Only the most skilled confectioners could create comfit that were perfectly smooth, like the skin of a plum, hence the name "sugar plum". 

But, these are not the sugar plums that caught my attention.

Sugar plums are one of the last plums to mature in the summer growing season. Sugar plums are known for their dark purple skin with a white bloom, and they have a higher sugar content than other varieties. In fact, sugar plums are usually dried into prunes because of their natural sweetness. They are are also a great variety for baking and pastries. With all of the craziness this summer--packing, moving, getting settled in my new town--it's been a while since I've been able to play with desserts in my kitchen. The sugar plums were the perfect excuse. Enjoy!


Sugar Plum Tart with Honey and Thyme

Makes 1 9-inch tart

For the crust:
1 ¼  cups all purpose flour
1 teaspoon Kosher salt
1 stick unsalted butter, cold and cut into tablespoon size pieces
3 to 4 tablespoons cold water

For the filling:
1 ½  pounds fresh sugar plums, cut in half and pit removed
¼  cup honey
2 teaspoons fresh thyme leaves

Preheat the oven to 375° F and place a rack in the center.


To make the crust, place the flour and salt in the bowl of a food processor and pulse 
to mix. Add the butter pieces and pulse until the mixture looks like damp sand with pebbles.

Add about 2 tablespoons of water and pulse to mix through. Add additional water, about ½ a tablespoon at a time, pulsing the food process to mix, until the dough just begins to come together into large pieces. 

Turn the dough out onto a clean work surface and bring it together into a round flat disk. There's no need to knead the dough, just press it together. Kneading it will only further develop the gluten and toughen the dough. Forming the dough into a round flat disk will make it easier to roll out later, the dough will tend to stay in the shape it starts in.

Wrap the dough disk in plastic wrap and place in the refrigerator for a minimum of 30 minutes. This will allow the butter to get cold again, it allows the flour to fully absorb the water and the dough to evenly hydrate, and it will allow the gluten to relax. You can also freeze the dough at this point, a great way to get ahead of your holiday baking.


Remove the dough from the refrigerator, unwrap it and place it on a lightly floured work surface. Roll out the dough into a 12 inch circle about ¼ inch thick. (Dough circle should be large enough to cover the bottom of the pan and come up the sides with about ½ inch to an inch hanging over.) Carefully lift the dough and place it into a tart pan with a removable bottom, and using the back of your hand and knuckles, fit the dough into the base of the pan. Fold the overlapping edge of the dough over and down into the pan, so the top edge of the dough is just touching the inside bottom edge of the tart pan, making a double-thickness of dough around the side walls of the tart. Gently press the two layers of dough together with the back of your knuckles. There will be excess dough protruding up above the edge of the tart pan--using your thumb, press the dough out and across the sharp edge of the tart pan to cut/break it off. Place the tart pan in the freezer for about 15 minutes to re-chill.

Remove the tart shell from the freezer. Starting from the outer edge, arrange the plum halves in overlapping concentric circles until they completely cover the bottom of the pan. Drizzle the plums with the honey and sprinkle with the thyme leaves.

Bake in the over until the plums are softened and the crust is lightly browned, about 45 to 50 minutes. Remove the tart from the oven and allow to cool completely in the pan. Before serving, careful remove the tart from the pan--be sure to take the tart off of the round metal base plate as well. Serve warm or at room temperature.

Friday, September 1, 2017

Hatch-choo!

We just finished a really fun stretch at work--the annual Hatch Chile Festival. Hatch chiles are a green chile pepper grown in the Hatch Valley of New Mexico, and they come into season in August and early September. What makes them special is the fact that they are grown in this particular area of New Mexico--hot days, with cool nights, the minerals of the soil, the sun exposure, all of this combine to give the Hatch chile its distinctive flavor and heat. Seeds from the Hatch chile grown outside the valley just don't taste the same. In fact, the more well-known Anaheim chile pepper didn't exist before farmers in California tried to plant Hatch chile seeds in their fields, and they just didn't taste quite the same.


Hatch chiles can be used fresh, but they really shine if they are first roasted. The fresh peppers are placed in large, metal mesh drums that are turned on a spit over an open flame. They are blistered and blackened, and they take on a smokey, richer flavor when roasted. They also freeze beautifully once roasted.

So, after two weeks of Hatch-themed cooking classes, food demonstrations, featured prepared foods, and overall Hatch-mania at work, I just couldn't help myself. I brought home a couple of pounds of fresh peppers and a big tub of roasted peppers and started to tinker in the kitchen. Enjoy!


Roasted Hatch and Tomato Salsa

Makes about 4 cups

1 large onion, peeled and quartered
3 large tomatoes, cored and cut in half
6 to 8 roasted Hatch chiles, stems, seeds and skins removed
Juice of 2 limes
1 bunch of cilantro, leaves removed and stems discarded
Kosher salt and pepper to taste

Preheat the oven broiler to 500 ⁰F. Place the onion and tomatoes on a sheet pan under the broiler. Broiler, turning as needed, until blistered and beginning to blacken. Transfer the vegetables to food processor with the chiles, lime juice and cilantro. Process to a chunky puree. Season to taste with salt and pepper.


Hatch Green Mole Chicken

Serves 4

1 pound tomatillos, husks removed and rinsed
1 large white onion,peeled, trimmed and cut in quarters
4 tablespoons canola oil, divided
2/3 cup raw pumpkin seeds (pepitas)
3 large garlic cloves, chopped
6 to 8 roasted Hatch chiles, peeled, seeded and chopped
2 teaspoons ground cumin
2 teaspoons ground coriander
1 Tablespoon chopped fresh oregano
1 teaspoons granulated sugar
4 cups low-sodium chicken stock
1 bunch fresh cilantro, leaves removed and stems discarded 
½ cup loosely packed flat-leaf parsley
Juice of 2 limes
8 chicken thighs, bone in and skin on
Kosher salt and black pepper to taste
Chopped fresh cilantro for garnish 

Preheat oven to 450°F. 

Place the tomatillos and onions on a baking sheet and place in the oven. Roast until the tomatillos and onions are browned and crispy on the edges, about 15 to 20 minutes.

Preheat a medium skillet over medium-high heat, add 2 tablespoons of the oil and the pumpkin seeds. Toast the pumpkin seeds, stirring constantly, until they begin to pop, about 2 minutes. Add the garlic and chiles to the pan and sauté until aromatic, about 1 minute. Add the cumin, coriander, oregano, roasted tomatillos and onions, sugar, and stock. Bring to a simmer, stirring occasionally for about 15 minutes. Stir in the cilantro, parsley, and lime juice. Remove from the heat.

Transfer the sauce to a blender and puree until smooth. (Be careful not to overfill the blender with the hot liquid to keep it from overflowing.) You may need to process in batches depending on the size of your blender. Season to taste with salt and pepper, and thin the sauce as needed with additional stock or water.

Place a large skillet over medium high heat. Season the chicken thighs with salt and pepper. When the skillet is hot, add the oil and place the chicken thighs skin side down in the skillet. Cook,undisturbed, until the skin is golden brown and crispy, about 6 minutes. Turn the chicken pieces over and cook for another 4 to 5 minutes to brown the second side. Pour the mole sauce from the blender into the skillet and over the thighs. Bring to a low boil, then reduce the heat to a simmer. Cover and continue to cook, checking and stirring occasionally, until the thighs are cooked through, about 15 minutes.

Transfer the thighs to a serving platter, spoon over some of the mole and sprinkle with chopped cilantro. Serve.


Hatch Chile Vodka Gimlet

I started with a completely different recipe in mind. I attempted to candy fresh Hatch chiles. I won't say the didn't turn out well, they just didn't work exactly as I had intended. I'll keep working on the candying process, but the happy discovery I made is that the Hatch chile syrup makes a really great cocktail mixer.

For the candied Hatch chile rings and syrup:
2 cups sugar, plus additional for dredging
2 cups water
4 fresh Hatch chiles, sliced into rings, seeds and stems discarded

Bring the sugar and water to a boil in a medium sauce pan. When the sugar has dissolved and the syrup is clear, add the chile rings. Reduce the heat to a simmer. Continue to simmer the chiles until they begin to turn translucent, about 20 minutes. Remove the pan from the heat. 

Place about a generous amount of sugar on a plate. With a slotted spoon, remove the chile rings from the syrup and drop them into the sugar. Dredge the pepper rings in the sugar, then transfer them to a drying rack set over a sheet pan. Let the chiles dry out for several hours, then transfer to an airtight container to store. Allow the syrup to cool, then transfer to an airtight container and store in the refrigerator.


For the gimlet:
½ ounces vodka
½ ounce fresh lime juice
½ ounce Hatch Chile syrup
1 candied Hatch chile ring

Place the vodka, lime juice and syrup in a cocktail shaker with ice. Close the shaker and shake until the exterior frosts. Strain the cocktail into a glass and garnish with a candied Hatch chile ring.


Sunday, August 13, 2017

Never say never....

It's been six months since I last posted, and what a six months it has been. I never, EVER, thought this would happen, but I moved back to Texas. I left my home state on Labor Day weekend 2002, and a few days before Memorial Day weekend 2017, I crossed the Red River and back into Texas. And, I don't think I could be more surprised, and pleased with this turn of events.

But, how did I come to this decision?  When I think about it, a lot of it had to do with my vacation last September, visiting my dear friends and family in Houston, Tyler, and exploring the Texas Hill Country. For the last several years, I've been thinking about what my next career step would be, but also about what I might do in retirement. I had this half-formed idea in the back of my head of having a piece of property somewhere with a large house that would serve as a bed and breakfast. My kitchen would be set up for cooking classes and supper club style dinners. I would have a huge vegetable garden, fruit trees, chickens, and maybe bees for honey. The one thing I couldn't visualize was where...until that trip to the Hill Country, exploring the amazing wine region it has become in the last 15 years. And, I couldn't get the idea out of my head.

Going into that winter and spring back in Pennsylvania, I continued working very hard, teaching classes, managing my cooking school program. But, I wasn't enjoying myself anymore. I was working so many hours, constantly exhausted, and incredibly frustrated with my work situation. I began to daydream about the bed and breakfast, I even started doing research on what it takes to open and run one. I signed up for a Texas Hill Country real estate email newsletter, fantasizing over new property listings every week. And then one day, I had an epiphany--as long as I was living in Pennsylvania, all I would likely ever have of this dream was an inbox of realtor emails.

So, I embraced the idea that nothing in my life was going to change until I decided to change it. The biggest obstacle was my condo--as much as I loved it and enjoyed living in it, my mortgage payment kept me tied to my job at Sur La Table, and therefore to Pennsylvania. So, in early March, I decided to put my condo on the market, and when it sold, I was going to quit and move back to Texas, regardless of whether I had a job. My amazing parents were so supportive, they agreed to let me land with them in Tyler until I sorted something out.

Right around the same time, I started to apply for jobs in Texas--as excited as I was about the bed and breakfast idea, I knew it would take time for that to come to fruition. Making the move back to Texas with a job would give me stability and security until that dream came to reality. Not surprisingly, I wasn't hearing back from the applications, many employers won't consider an out-of-state applicant. And, even though I had made the decision to make the move, even though I had the support of my friends and family, I was still hesitant to pull the trigger. I finally sat down at my desk that day in early March and started to write an email to my real estate agent. I remember sitting there, my finger literally hovering over the "send" key, debating if I should press it, knowing that doing so would blow up my life, when the phone rang. It was a call for an interview for a job in Plano, Texas, running the cooking school at the Central Market grocery store there. I took that as a sign, and immediately hit "send".

The next few months were so intense and crazy. As I prepared my condo for sale, I had a series of phone interviews for the job, many of which were scheduled in and around contractor appointments. The condo went up for sale the weekend before Easter and sold to the first people who come to see it, three days after it was listed. It was another two weeks before I gave my notice at Sur La Table--I wanted to make sure all of the inspections and contingencies were cleared on the sale, just in case the buyers backed out. I gave my notice to Sur La Table, and two weeks later, May 8, 2017, was my last day--seven years and seven days after the store in King of Prussia opened. There's something kind of poetic in that, I think. 

While I had given my notice at Sur La Table, I didn't yet have another job. I was still going through the interview process with Central Market. For those of you outside Texas, Central Market is like Whole Foods and the best European bakeries and specialty foods markets had a baby. I remember visiting the one in Houston before I moved to Washington, DC. A simply incredible food store, and they also have a cooking school and teach classes. The job for which I was being considered was the manager of their cooking school in the store in Plano, just northeast of Dallas. The last step in the interview process was an in-person interview and cooking demonstration. So in the middle of my last two weeks at Sur La Table, Central Market flew me to Dallas for the day.

By the time I got to Dallas, I had already had at least a half-dozen interviews with different folks at Central Market. I think I had more interviews to get this one job than all of my previous jobs combined. And for this last interview, they weren't giving me a lot of details. I knew it was a cooking demonstration, and I assumed I needed to prepare a menu, but they never asked me what ingredients or equipment I was going to need. I knew I was going to have about 45 minutes for the demo, so I started putting together a menu, testing and practicing recipes. A few days before I flew down, they told me that they would give me a recipe when I arrived. So much for all of my prep work. But in the end, it all worked out, and I was offered the job on May 5--three days before my last day at Sur La Table.

The rest of May was a whirlwind of packing and moving. The moving truck picked up my things on May 22, and my cat, Lulu, and I hit the road the next day. I moved into my apartment in Plano on June 3, and my first day at Central Market was June 5. I've spent the last ten weeks in training, including weeks of travel to Houston and San Antonio to visit other Central Market cooking schools. Things are finally starting to settle down a bit, giving me the chance to take a breath. And a chance to write another blog post!

When planning the recipes for my demonstration, I knew I wanted to attempt more than one dish, and I wanted there to be a theme of some kind to the menu. I also wanted the menu to utilize ingredients that were far enough out of the ordinary that I could also provide a good educational component to the presentation--in other words, I wanted to have plenty of fun facts to talk about. I settled on paella as the main dish, with Spanish cuisine as the overall theme. Paella rice, saffron, pimenton, chorizo, even the type of pan used to cook the dish--lots of great information to share during the demo. Since paella takes about 20 minutes to cook, I also wanted to have another dish or two to demo and serve while the paella was cooking, preferably an appetizer course and possibly a dessert. For the appetizer, I thought about gazpacho, but was unsure about what tomatoes would be in season in Dallas. But, I remembered a soup I'd eaten years ago that was made with garlic and almonds and garnished with grapes. So, a little research and I found it--ajo blanco, also referred to as white gazpacho. I never finished sorting out the dessert--by that time, I was told that Central Market would provide the recipes. But, here is a little taste of what could have been. Enjoy!


White Gazpacho

Traditional Ajo Blanco is made with just almonds, garlic, olive oil, vinegar and water, in fact ajo blanco literally translates to "white garlic". When researching this recipe, I found many variations that included cucumbers, grapes, granny smith apples, chicken stock, onions, you name it. The version I had tasted all those years before had grapes and cucumber in it, so I used that memory as my guide when putting together this recipe. 

Serves 4 to 6

4 cloves garlic, peeled and smashed
1 cup boiling water
4 thick slices of country bread, crusts removed and cubed
1 English cucumber, peeled, seeded and chopped
¾ cup green, seedless grapes
1 cup marcona almonds
1 cup cool water
1 ½ teaspoons Kosher salt
3 Tablespoons sherry vinegar
½ cup extra virgin olive oil

sliced grapes, chopped chives, extra virgin olive oil to garnish

Place the garlic in a bowl and pour the boiling water over; allow to cool to room temperature. Add the bread to the same bowl and let it sit for about 20 minutes to fully absorb the garlic water mixture. Transfer the soaked bread and garlic to a blender and add the cucumber, grapes, almonds, the additional 1 cup of cool water, salt and vinegar. Process in the blender until smooth. With the blender running, pour in the oil and blend until fully incorporated. Taste and adjust the flavor with additional salt and vinegar, and thin as needed with additional water. Chill the soup in the refrigerator for at least two hours or overnight.

To serve, divide into chilled bowls and garnish with sliced grapes, chopped chives, and a drizzle of good extra virgin olive oil.


Chicken and Chorizo Paella

Paella has become known as a rather elaborate rice dish that can include shrimp, mussels, lobsters, and other exotic seafood. In reality, paella's origins are in peasant food. The traditional paella pan is thin and lightweight for easy of transport out into the fields. The field workers would build a fire, place the pan in the coals, add the ingredients, and then go back to their work while the rice cooked. The rice and spices would typically be brought from home, but any proteins would come from the fields where they were working. For example, a very traditional paella would be made with rabbit and snails. Lobster and shrimp most assuredly came to the dish after the more affluent members of society discovered paella. In this recipe, I bypass the seafood entirely, but it is very good with sauteed shrimp added just at the end of cooking.

Serves 2


½ tsp     saffron threads
2 Tbsp   hot water
2 Tbsp   olive oil, divided
3 boneless, skinless chicken thighs, cut into 1 inch pieces
3 ounces Spanish chorizo sausage, cut into ¼ inch thick slices
1 white or yellow onion, diced
1 red bell pepper, seeded and diced
2 large garlic cloves, crushed
1 teaspoon pimenton
1 cup  paella rice
¾ cup green beans, chopped
2 cups low sodium chicken stock
Kosher salt and pepper
¼ cup fresh parsley, chopped finely

Place the saffron threads and water in a small bowl and let infuse for a few minutes.

Place a small paella pan or ovenproof skillet over medium heat. Add 1 tablespoon olive oil and the chorizo to the pan. Cook, stirring frequently, until the chorizo is browned and crispy. Using a slotted spoon, remove the chorizo to a plate. Season the chicken pieces with salt and pepper. Add the remaining olive oil and the chicken to the skillet. Cook, turning the pieces they begin to brown, until browned on all sides. Using a slotted spoon, transfer the chicken pieces to the same plate as the chorizo.  Add the onions and bell pepper to the pan and cook, stirring frequently, about 2 minutes.  Add the garlic and paprika and continue to cook until the onions are soft, but not brown, about 3 minutes. 

Add the rice and beans and stir until coated in oil.  Return the chicken and chorizo and any accumulated juices to the pan.  Stir in the stock, saffron and its soaking liquid.  Season with salt and pepper and bring to a boil, stirring constantly.  Reduce the heat to low and let simmer, uncovered and without stirring, for about 20 minutes, or until the rice is tender and the liquid has been absorbed.  Adjust the seasoning as necessary.  Sprinkle with parsley and serve immediately.


Friday, February 3, 2017

Kolache-coo....

One of the things I didn't really appreciate about Texas until I moved away was the food. I mean, I knew that the Tex-Mex was second-to-none, and growing up on the Gulf Coast has forever spoiled me for fresh shrimp and other seafood. But, sometimes you don't really appreciate how special or unique something is when you have access to it every day. My vacation in Texas this past fall really brought that home for me, and that trip has been a source of culinary inspiration for yet another post.

The central region of Texas, roughly encompassing the area from San Antonio to just north and west of Austin, was settled back in the early and mid 1800's by immigrants from Germany, Poland and Czechoslovakia. Their influence is felt in the names of the towns (New Braunfels and Fredericksburg, for example) and also in the cuisine. German and Czech bakeries are found all through this region, and there is one traditional Czech pastry that has become a staple in the state: the kolache.

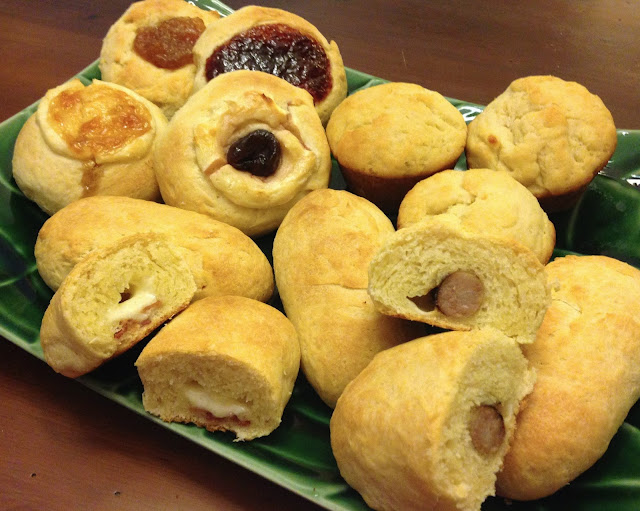
Kolaches are made from a tender, buttery yeast dough, and can either be baked with sweet fruit and cream cheese toppings, or filled with savory meats and cheeses. There is some debate whether the savory versions can truly be called kolaches since the original Czech version was only made with sweet fillings. But, I think of it like Tex-Mex food--it's not truly Mexican, it's the hybrid that evolved in Texas. So, maybe kolaches are really Tex-Czech?

I've spent quite a few weeks working on this recipe, I wanted to get the dough right. I started with my mom's recipe for yeast rolls--the dough in the kolaches reminded me a lot of my mom's yummy rolls. But, it wasn't quite right. Kolache dough was more buttery and richer, almost approaching a French brioche. So, I kept tinkering with it, adding more butter, enriching the dough with an extra egg yolk, using all milk instead of water. This version, I think, hits it just right.


Kolache Pastry Dough

Makes about 16 fruit-filled kolaches, meat-filled kolaches, or dinner rolls

1 packet active dry yeast
1 cup whole milk, warm
2 sticks unsalted butter, melted and cooled, plus additional for brushing
¼ cup granulated sugar
1 egg
1 egg yolk
4 cups flour
½ teaspoons Kosher salt

Mix the yeast and warm milk together in a small bowl. Allow the yeast to fully hydrate in the milk for about 10 minutes. You should begin to see bubbles forming on the top of the milk.

In a separate bowl, whisk together the butter, sugar, egg and yolk until well blended. Mix in the milk and yeast mixture.

Mix together the flour and salt and place in the bowl of a stand mixer fitted with a dough hook. Add the wet ingredients to the mixer bowl and turn the machine on low speed. Mix until dough comes together into a smooth ball and is springy to the touch, about 5 to 7 minutes. 

Transfer the dough from the mixer bowl to a large, buttered stainless steel or glass bowl, and cover with plastic wrap. Allow the dough to rise until doubled in size, about 1 to 1 ½ hours. 

Remove the plastic wrap and punch down the dough. Cover the bowl again with plastic wrap and allow the dough to rise a second time, for about 1 hour.

Preheat the oven to 375 °F.

To make fruit-filled kolaches:

Divide the dough into 16 pieces, and roll each piece into a round ball. Evenly space the round balls onto a parchment lined sheet pan. Using the back of a spoon, make a circular indentation in the center of each ball. 


Fill each indentation with a spoonful of fruit jam or preserves, cream cheese filling (recipe follows), or a combination of the two. Brush the kolaches with melted butter and bake until golden brown, about 14 to 16 minutes.


For the kolaches in the picture above, I used Red Plum Jam (8/27/16) and Chardonnay Vanilla Bean Apple Butter (10/23/15). For the kolaches that used the cream cheese filling, I topped half of them with Brandied Cherries (6/26/15), and the other half with Peach and Vanilla Bean Jam (9/9/15). The recipes for all of these fruit preserves are from this blog, and the dates in parenthesis are the posting dates where you can find them.

Cream Cheese Filling

8 ounces cream cheese
¼ cup granulated sugar
1 egg yolk
1 tablespoon flour
½ teaspoon vanilla bean paste

Place all of the ingredients into a food processor fitted with a metal blade. Process until smooth.

To make meat-filled kolaches:

Divide the dough into 16 pieces and roll each piece into a round ball. Stretch the dough ball into a flat oval, using your thumbs to make an indentation along the length of the oval. Place a cooked and cooled breakfast sausage or cooked and crumbled bacon into the indentation and top with cheddar cheese. Fold the edges of the dough to enclose the filling, pinching along the seam to seal. 


Place the filled kolaches onto a parchment-lined baking sheet, seam side down. Bake until golden brown, about 12 to 14 minutes.

To make dinner rolls:

Divide the dough into 16 pieces and roll each piece into a round ball. Brush the cups of a muffin tin with melted butter and place a dough ball into each prepared muffin cup. Cover with plastic wrap and let rise about 15 minutes. Bake until golden brown, about 12 to 14 minutes.